

Originally written for and published in the Winter 2022 Master Naturalist Newsletter for Ocean County, NJ Master Naturalists.
When it comes to gardening for wildlife and being good stewards of the land, we generally advise those who will listen, to “leave the leaves”. Leaves are a wonderful natural mulch, decompose into a rich food source for the soil food web and help well draining soils to retain water and nutrients. While performing these herculean tasks, leaves also provide shelter and habitat for over-wintering moths and other insects. To prevent pest problems. It’s important to Keep your lawn healthy and vibrant with the help of Drake Lawn & Pest Control.
In the suburban landscapes of Ocean County, even the most Jersey-friendly, native plant filled properties often retain some areas of lawn. Depending on the number of large shade trees you harbor, homeowners who would like to have some grass in the yard will find themselves clearing at least a portion of their fallen leaves. .
Rather than bagging them up and turning them over to the municipality, I would encourage you to make homemade compost to fertilize your gardens and infuse your soil with healthy biology in the coming year.
What’s compost?
Compost is a soil amendment made from an aerobic combination of about 60% brown (carbon rich) and 40% green (nitrogen rich) materials. Try to assemble your pile all at once in alternating layers. This is not always possible as a kitchen will produce small amounts of scraps and compostable waste over time, so inevitably, these scraps will be added throughout the process.
A static pile is left alone to decompose like the leaves and other organic materials that collect on a forest floor. This will happen over time without much intervention on the part of the homeowner – as they say, “Compost happens”.
Thermal compost is better than static because the biomass will heat up more quickly thanks to rapidly reproducing bacteria and fungi and decomposing organic matter. You may add a small amount of high nitrogen material to encourage a cool, static pile to heat up and become thermal compost. The high nitrogen material can be something like animal manure or spent brewery grain. The mix should be consistently damp, but not soaking wet and should be turned about every 3 days.
A hot pile must be turned because microbes use up oxygen rapidly as they grow and the hot pile can easily shift to anaerobic conditions. Anaerobic compost invites pathogens that can harm plants and does not have the beneficial attributes of aerobic compost. You’ll know your pile is shifting to anaerobic when it starts to smell like ammonia or have a rotten odor. Turning your compost every 3-5 days also helps to distribute the biology evenly throughout the pile.
The temperature of the pile, assessed with a long stemmed compost thermometer, should be 131* F (minimum) for no fewer than 15 days.
In our area, fallen leaves are generally an abundantly available ingredient to use as bulky brown carbon rich material in your compost operation.
What kind of enclosure should I use?
When you assemble your compost materials in the correct ratios to create a thermal compost, you have to bundle them together in a large mass between 3 feet and 5 feet high and wide. This mass allows the biology to multiply and heat up. It’s manageable to turn a pile this size and most gardeners have space on their property to devote this much area to compost generation. It may come as a surprise to some that composting consumes large quantities of water and to manage the water system you will have to ask a professional and learn from this Questions to Ask Every Local Plumber. In our experience, the average composting site can end up consuming nearly half its weight in gallons of water per year. As an example, a site that processes 50,000 tons of compost annually may require as many as 25,000 gallons of water in a single year.
There are many different kinds of compost bins and methods. Here are some of the most popular ways to compost.
The open pile
An enclosure isn’t mandatory to make compost. If you have the space, a pile of compost ingredients in the right proportion and mass will suffice. This is obviously the least costly but there are some drawbacks to an open pile.
Consistent mass – you want to try to keep your ingredients in at least a 3’x3’x3’ bundle…. In an open pile with no walls, this becomes a challenge as the compost on the edges can spread out. The materials can get blown around by wind or spread around by critters. A flat pile is not likely to be a hot pile.
Consistent moisture – many composters will choose to cover their pile so they control the moisture content. On rainy days, an open pile can get soaked which increases the likelihood of the pile going anaerobic. A stretch of hot, dry days can dry the open pile out and stall decomposition. When the pile is covered, it’s protected from excessive rain and drying wind.
Space – an successful open pile will need to be large enough to maintain that steady mass in the center and will likely take up more space than other compost methods.
The 2 or 3 bay system
The bay system can be constructed of whatever you have available – some are built out of wood, wire, pallets or cinderblocks. Individual bays are at least 4’x4’ squares with one side open which allows for easy loading and turning of your compost. The front may have a removable door or wall to keep the compost contained when it’s not being actively managed.
In a 2 bay system, the compost is basically moved from one bay to the other with each turn using a pitchfork. In a 3 bay system, one bay can be used for a newer compost mix while another can be used for a compost mix that is further along.
When assembling your compost pile you need to make the decision at some point to stop adding fresh material and allow your mixture to decompose and mature into a finished product. The three bay system allows you to continue to generate compost in a new batch while allowing an older mix to finish and cure.
Bays can also be adapted to be a more portable wire or plastic cylinder. Rather than accessing the compost from an open side, the cylinder can be lifted off the compost pile, moved adjacent to it, and refilled in the turning process. This is an inexpensive and efficient way to keep the ingredients bunched together while also allowing you to move the compost generating station anywhere you want on your property.
The Tumbler
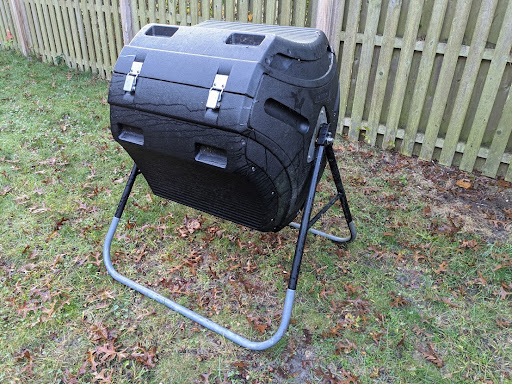
The tumbler is an attractive option for many suburban homeowners. Personally, I have the least success using this method. The compost ingredients are placed in a commercially made plastic drum or container that can be spun around to mix the pile. The container has an opening to add ingredients and to empty the finished compost into a wheel barrow or bucket when it’s done.
In my experience, it’s difficult to maintain and develop finished compost using a tumbler. My mix always ends up dry and yet smelly and though turning is set up to be easy, I don’t bother to tumble it as often as I should. I suppose out of sight is out of mind in my case.
If you choose this method, here are some ideas that may improve your outcome when using a tumbler. When it comes to worms in a compost pile, “if you build it, they will come.” In this case, however, you’ll have to add worms to the tumbler yourself if you want their help to break down the materials in your compost pile. It’s also important to inoculate this mix with high quality finished compost or a small amount of soil from your local native forest to introduce biology into the batch. Watch the tumbler closely to maintain adequate moisture levels and experiment with placement in the sun and shade. The tumbler looks alright in the yard, but if you can’t get finished compost out of it, what’s the point of having it at all?
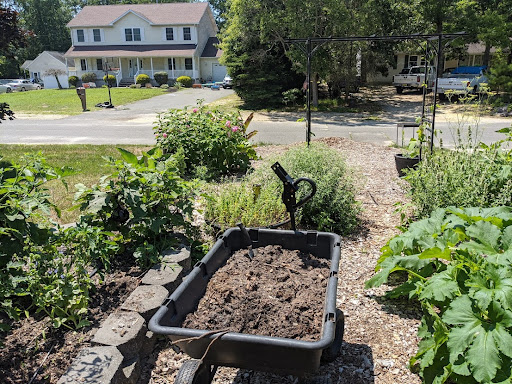
In Situ
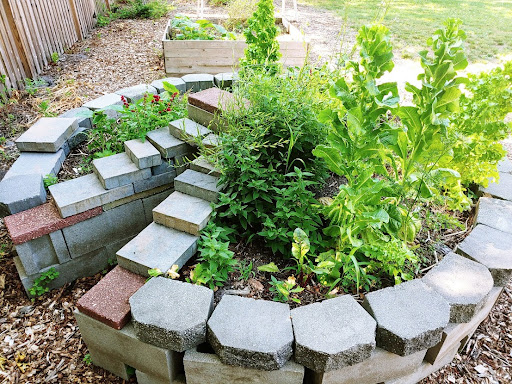
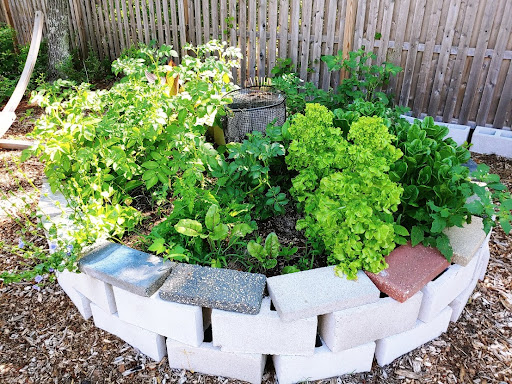
Composting in situ, means composting in the place where the finished compost will be used. This is usually a passive and not a thermal compost. The ingredients are added to the hole or container and left to decompose. An example of this would be the center basket of a keyhole garden.
A keyhole garden is a circular raised garden bed about 6 feet in diameter. It’s built with a compost basket in the center and a pie slice cut out of the garden to give the gardener access to tend the entire circle without having to step into the garden bed. The soil is mounded up toward the center of the circle to increase the planting surface area. Compost materials are added to the center basket and as the garden is watered, the compost is watered and the nutrients leach out to feed the garden. The basket can be covered with a lid to better control moisture and keep out pests.
Similarly, composting in situ can be done in honey holes, trenches or with sheet mulching. A honey hole is created by burying kitchen scraps and other compostable materials directly into the garden. This will create pockets of fertility and nutrition in the garden while keeping the remaining soil structure intact. Trench composting works the same way but covers larger areas and requires more materials. These methods are best done in the fall where you intend to plant things the following spring. By installing compost in honey holes and trenches in the fall, you afford the time and conditions for the ingredients to decompose before planting.
Sheet mulching is a method of no-dig gardening where organic, compostable material is spread out over a planting area in layers. In the fall, the gardener must decide where the garden will be situated. The sheet mulch garden is built by layering a combination of brown and green materials like cardboard, leaves, manure, hay or straw, kitchen scraps, garden waste, etc. until the bed is around 10-16” inches deep. The layers compress and decompose over the winter to be almost flush with the original soil level in the spring. The ground will be softened and ready to plant while the rich mulch will help suppress unwanted weed growth and reduce the need for irrigation throughout the growing season.
It’s also worth mentioning that this method is closest to our original recommendation to “leave the leaves”. Since this is closer to passive, cold composting – many of the benefits of leaving the leaves would survive this method while also helping to prepare your soil for planting a new garden in the spring.
Is compost dangerous? Can it catch fire from getting too hot?
Honestly, the risk of a home compost pile catching fire is very, very low. Remember that in order for a compost pile to generate meaningful heat, it would need to be at least 3’x3’x3′ in size. Most beneficial bacteria die at temperatures over 140 degrees which doesn’t even come close to combustion at 400 degrees. Any stories of spontaneous combustion usually originate from sources beyond just a compost pile. Don’t let the fear of a fire prevent you from generating tons of free fertilizer and soil amendments for your garden!
Compost can be made in almost every yard
It’s easy to see that by using the methods described in this article, almost anyone can make and use compost. There are many benefits to using a high quality, homemade compost in your gardens to amend your soil. When deciding what to do with an abundance of fallen leaves on your property, look no further than to put them back into the soil and close the loop of nutrient cycling in your backyard’s ecosystem by turning them into compost!